How to Restore Headlights: A Complete Step-by-Step Guide
SFP
Reading time: 7 minutes
Cloudy headlights reduce visibility and make night driving unsafe. The good news is you can fix them in less than an afternoon with simple tools. Here’s how to restore headlights to clear, like-new condition without spending a lot of money.
Most modern headlight lenses are made from polycarbonate plastic. It’s lightweight and durable but vulnerable to oxidation. Years of UV exposure, road salt, debris, and automatic car washes gradually eat away the factory clear coat. Once that coating wears off, the plastic starts to oxidize, turning hazy or yellow.
Moisture trapped inside the housing can make it worse. Even premium vehicles eventually develop a dull haze that no amount of washing will fix. The only solution is to remove the oxidized layer and restore the protective finish.
You don’t need a shop full of detailing equipment to do this right. Most of the supplies are inexpensive and easy to find.
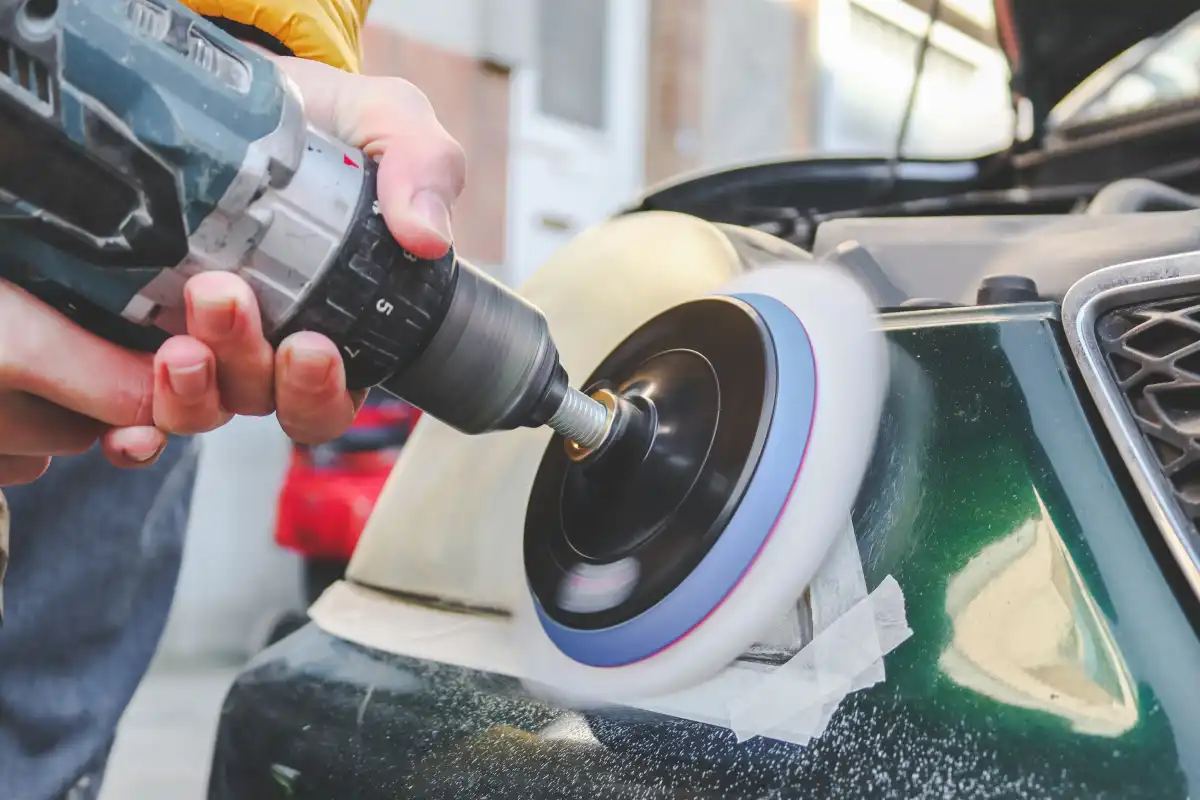
Start with a clean, dry headlight. Wash off dirt and grime using car soap and water, then dry the area thoroughly. Use masking tape to protect the surrounding paint and trim. This is one step you don’t want to skip. You’ll be sanding close to the bodywork, and even a brief slip can scuff the paint.
Fill your spray bottle with water and add a drop or two of dish soap. The soapy mix keeps the surface lubricated while sanding, which reduces friction and prevents deep scratches.
Begin with 800-grit sandpaper. Wet the paper and the headlight, then sand in straight, horizontal strokes. Keep the surface wet the entire time. You’ll see a milky residue forming; that’s the oxidized layer coming off. Wipe it away occasionally with a microfiber towel to check your progress.
Once the surface looks evenly dull and the yellowing is gone, move up to 1000-grit paper. Sand again, but switch to vertical strokes. This crosshatch pattern evens out the scratches from the previous grit.
Next, repeat with 2000-grit, sanding horizontally again. If you want a truly glass-like finish, follow with 3000-grit as the final step. This smooths the surface so it’s ready for polishing.
Pro tip: Use a separate piece of sandpaper for each headlight. Reusing worn paper can leave uneven scratches.
Once the sanding is complete, wipe each headlight clean with rubbing alcohol to remove residue. Now it’s time to polish.
Apply a small amount of rubbing compound directly to the headlight. Spread it evenly before turning on your drill or polisher to avoid splatter. Work the compound in using slow, overlapping passes. After a minute or two, increase speed slightly and continue polishing until the surface begins to shine.
Wipe clean with a microfiber towel and inspect the lens. You should see a dramatic improvement already. If the headlight still looks slightly dull, repeat the process using a finishing polish for extra gloss.
For those without a polisher, you can do this step by hand using a foam applicator pad, but expect to spend more time and effort.
If you prefer a complete setup, the Turtle Wax Headlight Restoration Kit on Amazon includes everything from compound to polishing pads.
Sanding and polishing remove the original UV coating, so this step is crucial. Without protection, the headlights will start to haze again in a few months.
You have several good options:
– 2K clear coat: The most durable finish. It provides up to two years of protection but must be applied carefully. Follow safety instructions and apply in a well-ventilated area.
– 3M clear coat wipes: Easier to use and safer for beginners. They deliver moderate protection for about a year.
– Ceramic coating: Excellent UV resistance and hydrophobic properties when applied after the clear coat cures.
Before applying any coating, wipe the headlights clean with rubbing alcohol. Then follow the product directions carefully. For sprays, apply light, even coats from about six inches away. For wipes, make long horizontal passes and let each coat dry completely.
Let the headlights cure indoors or in the shade. Avoid touching the surface for at least an hour, and do not wash the car for 24 hours.
Here are the before and after results:
To keep your headlights clear as long as possible, wash them regularly and avoid harsh cleaners. A quick wipe with car shampoo and a microfiber towel during every wash prevents buildup that accelerates oxidation.
Reapply your chosen coating or sealant once a year. If you park outdoors often, consider a ceramic coating for added protection. Some drivers even use paint protection film on headlights, though it’s more expensive and not necessary for everyone.
Parking in a garage or shaded area also makes a big difference. UV exposure is the single biggest reason headlights fade over time.
For tips on keeping your wheels spotless without risking damage, check out Fast and Safe Wheel Cleaning.
Even experienced DIYers make a few errors when they restore headlights. Here are the main ones to watch out for:
There is a huge payoff if you restore your headlights. You’ll see better at night, your car will look sharper, and you’ll extend the life of your lenses for years. So grab a restoration kit, a little sandpaper, and some polish, and bring those headlights back to life.
For readers looking to understand why headlights cloud or yellow in the first place, it helps to consult Car Surface Damage: Complete Guide.
Below are some of the most common questions drivers ask about cleaning or restoring foggy headlights.
No, WD-40 does not permanently restore headlights. It only provides a temporary shine and can actually cause damage over time. The product works by leaving a thin, glossy layer on the surface of the plastic, which makes the headlights look clearer for a short period. However, it does not remove the oxidation that causes the haze. Once the WD-40 evaporates, the cloudiness usually returns, and repeated use may weaken or discolor the plastic.
Yes, hydrogen peroxide can help clean headlights, especially when mixed with baking soda to create a paste that removes oxidation and haze. It is also used in other DIY cleaning methods, sometimes combined with vinegar or applied by soaking the lens. However, using high concentrations of hydrogen peroxide can be risky and may damage the plastic if not handled carefully.
Yes, a Magic Eraser can help clean cloudy headlights by removing surface dirt and yellowing, but it is not a lasting solution and may damage the plastic if used with too much pressure.